Welcome to xsconnect’s documentation!
Contents:
xsconnect


Generate pin assignment constraints for a given combination of XESS peripheral + motherboard + daughterboard.
- Free software: MIT license
- Documentation: https://xesscorp.github.com/xsconnect.
Features
- Automates the tedious process of creating FPGA pin assignments for a given combination of XESS FPGA board (e.g. XuLA2), motherboard (e.g. StickIt!) and peripheral board (e.g. StickIt! Audio I/O).
- Command-line version,
xsconn, for batch-file operations. - GUI version,
gxsconn, for even easier interactive use.
Installation
At the command line:
$ easy_install xsconnect
Or, if you have virtualenvwrapper installed:
$ mkvirtualenv xsconnect
$ pip install xsconnect
Some of the scripts use Tcl/Tk for the GUI, so if you’re using virtualenv under Windows, you might need to place the following inside the Scripts\activate.bat file in your virtual environment:
set "TCL_LIBRARY=C:\WinPython\python-2.7.6\tcl\tcl8.5"
Edit the above command to reflect the location of the Tcl library directory on your system.
Usage
To use xsconnect in a project:
import xsconnect
But you’re probably not interested in that. You really want to use the scripts that will generate the pin assignments for a given combination of peripheral, mother and daughter boards.
Command-Line Tool
xsconn is the command-line script for generating pin assignments:
usage: xsconn.py [-h] [-v] [-p [PERIPHERALBOARD]] [-m [MOTHERBOARD]]
                 [-d [DAUGHTERBOARD]] [-n [PORTNAME]] [-l]

Generate pin assignments for a given peripheral board, motherboard, and
daughterboard.

optional arguments:
  -h, --help            show this help message and exit
  -v, --version         show program's version number and exit
  -p [PERIPHERALBOARD], --peripheralboard [PERIPHERALBOARD]
  -m [MOTHERBOARD], --motherboard [MOTHERBOARD]
  -d [DAUGHTERBOARD], --daughterboard [DAUGHTERBOARD]
  -n [PORTNAME], --portname [PORTNAME]
  -l, --list
For example, if a StickIt! LEDDigits peripheral board is connected to the PM3 port of a StickIt! V3 motherboard which in turn holds a XuLA2 FPGA board, then the command:
xsconn -p leddigits -m stickit3 -n pm3 -d xula2
will generate the output:
########################################################################
# StickIt! LED Digits V2 ==[pm3]==> StickIt! V3 ==> XuLA2
net s0 loc = k3;
net s1 loc = r1;
net s2 loc = m16;
net s3 loc = r15;
net s4 loc = j4;
net s5 loc = m2;
net s6 loc = k15;
net s7 loc = m15;
########################################################################
This lists the input nets of the LED board and the pins of the FPGA on the XuLA2 to which they are connected in a format suitable for inclusion in a user-constraints file used by the FPGA development tools.
Note: Use the xsconn -l command to get a list of all the possible peripheral
boards, motherboards, and daughterboards that are currently supported.
Note: Fuzzy string matching is used on the arguments
so you don’t have to type the exact names of the boards: xsconn
will make a best guess about what you mean.
But it may guess wrong if you provide only a small part of a board name,
so it always makes sense to check the top line
of the output to see how xsconn resolved your inputs.
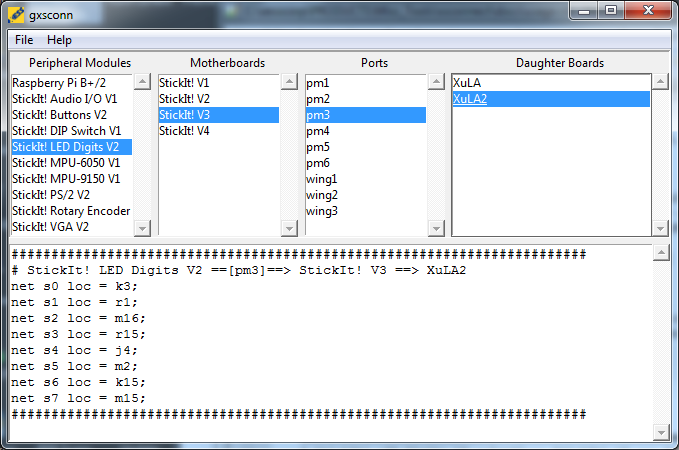
GUI Tool
gxsconn is the GUI version of xsconn.
All you need to do is highlight the various boards you are connecting
and the associated pin assignments will immediately appear in the lower pane of the window.
The pin assignments can be cut-and-pasted or saved directly to a file.
Contributing
Contributions are welcome, and they are greatly appreciated! Every little bit helps, and credit will always be given.
You can contribute in many ways:
Types of Contributions
Report Bugs
Report bugs at https://github.com/xesscorp/xsconnect/issues.
If you are reporting a bug, please include:
- Your operating system name and version.
- Any details about your local setup that might be helpful in troubleshooting.
- Detailed steps to reproduce the bug.
Fix Bugs
Look through the GitHub issues for bugs. Anything tagged with “bug” is open to whoever wants to implement it.
Implement Features
Look through the GitHub issues for features. Anything tagged with “feature” is open to whoever wants to implement it.
Write Documentation
xsconnect could always use more documentation, whether as part of the official xsconnect docs, in docstrings, or even on the web in blog posts, articles, and such.
Submit Feedback
The best way to send feedback is to file an issue at https://github.com/xesscorp/xsconnect/issues.
If you are proposing a feature:
- Explain in detail how it would work.
- Keep the scope as narrow as possible, to make it easier to implement.
- Remember that this is a volunteer-driven project, and that contributions are welcome :)
Get Started!
Ready to contribute? Here’s how to set up xsconnect for local development.
Fork the xsconnect repo on GitHub.
Clone your fork locally:
$ git clone git@github.com:your_name_here/xsconnect.git
Install your local copy into a virtualenv. Assuming you have virtualenvwrapper installed, this is how you set up your fork for local development:
$ mkvirtualenv xsconnect
$ cd xsconnect/
$ python setup.py develop
Create a branch for local development:
$ git checkout -b name-of-your-bugfix-or-feature
Now you can make your changes locally.
Commit your changes and push your branch to GitHub:
$ git add .
$ git commit -m "Your detailed description of your changes."
$ git push origin name-of-your-bugfix-or-feature
Submit a pull request through the GitHub website.
Pull Request Guidelines
Before you submit a pull request, check that it meets these guidelines:
- If the pull request adds functionality, the docs should be updated. Put your new functionality into a function with a docstring, and add the feature to the list in README.rst.
Credits
Development Lead
- XESS Corporation <info@xess.com>
Contributors
None yet. Why not be the first?
History
0.1.4 (2016-11-04)
- Added support for StickIt! Rotary Encoder V2.0.
- Added support for StickIt! SmallButtons V1.0.
- Added support for StickIt! AudioIO V2.0.
- Added support for StickIt! QuadDAC V1.0.
- Added support for Logic Pod Mini V1.0.
- Added support for CAT Board.
0.1.3 (2015-09-12)
- Replaced explicit scripts with entrypoints.
0.1.2 (2015-07-14)
- Added definition file for the StickIt! Grove board.
- Removed travis testing requirement.
0.1.1 (2015-06-01)
- Added generic peripheral device for getting FPGA pin assignments for each connector pin of the StickIt! Board.
0.1.0 (2015-05-25)
- First release on PyPI.